Notifications are typically used for when a taken action is successful or results in an error or warning. They can also be used to show informational messages.
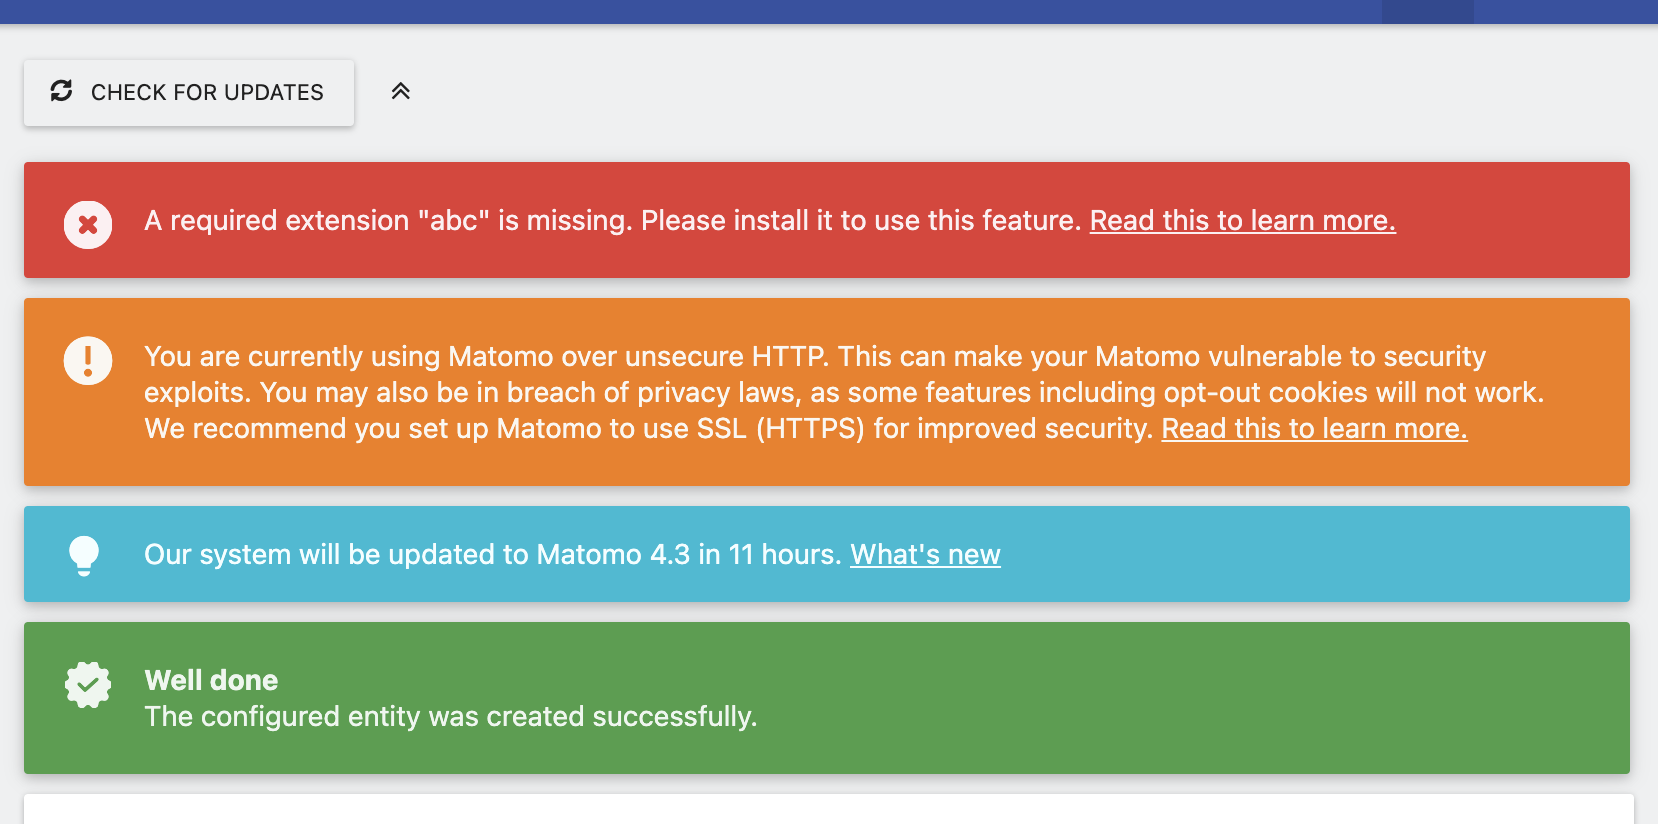
Above screenshot shows notifications of type error, warning, info and success. The last notifications uses a notification title ("Well done").
To trigger a notification, create an instance of a notification object and call the notify method to actually show the notification:
$id = '$PluginName_$NotificationId'; // for example `MyPluginName_unsuccessfulLogin`.
$notification = new \Piwik\Notification('My notification message');
\Piwik\Notification\Manager::notify($id, $notification);
This example triggers an info notification (default) with the message My notification message and is shown in the status bar of Matomo (below the update checker and site selector).
The notification ID should be a unique ID and ideally consist of your plugin name as well as some identifier that identifies this type of notification. The ID makes sure that the same notification won't be shown multiple times if it was triggered multiple times during the same request.
A set title will be displayed before the message content.
$notification->title = 'My notification title';
You can change the context (severity) of the notification by setting the context property and assigning a Notification::CONTEXT_* constant. For example:
$notification->context = Notification::CONTEXT_SUCCESS;
$notification->context = Notification::CONTEXT_INFO;
$notification->context = Notification::CONTEXT_WARNING;
$notification->context = Notification::CONTEXT_ERROR;
By default, a notification is shown only on the same page view as it was triggered. However, you can change this behaviour by setting a different type:
$notification->type = Notification::TYPE_TOAST;
$notification->type = Notification::TYPE_PERSISTENT;
A notification of type toast is shown just like a regular notification but it will disappear after a few seconds.
A notification of type persistent will be displayed until the user explicitly closes the notification. The notifications will display even if the user reloads the page.
If you need to use HTML as part of your notification message, for example to show a link, then you need to set the flag $raw to true. If you enable this flag, make sure the message does not contain any user input or only safely escaped user input for security reasons.
$notification->raw = true;
Learn more about the Notification class in the API reference.
Client side notifications can be shown using the NotificationsStore singleton:
import { NotificationsStore } from 'CoreHome';

const instanceId = NotificationsStore.show({
    id: 'MyPluginName_unsucessfulLogin',
    type: 'transient',
    context: 'info', // or 'warning' or 'error' or 'success'
    title: 'Optional',
    message,
});

setTimeout(() => {
    NotificationsStore.scrollToNotification(instanceId);
}, 200);
The options are the same as for PHP notifications.
To place a notification in a specific part of the page, use the Notification Vue component specifically in
another component.
To place a notification outside of Vue, you can use the placeat option:
import { NotificationsStore } from 'CoreHome';

const instanceId = NotificationsStore.show({
    type: 'transient',
    context: 'info', // or 'warning' or 'error' or 'success'
    title: 'Optional',
    message,
    placeat: '#mySelector', // this can also be an HTMLElement
});
The element that placeat references will be mounted as Vue app and any initial contents removed.